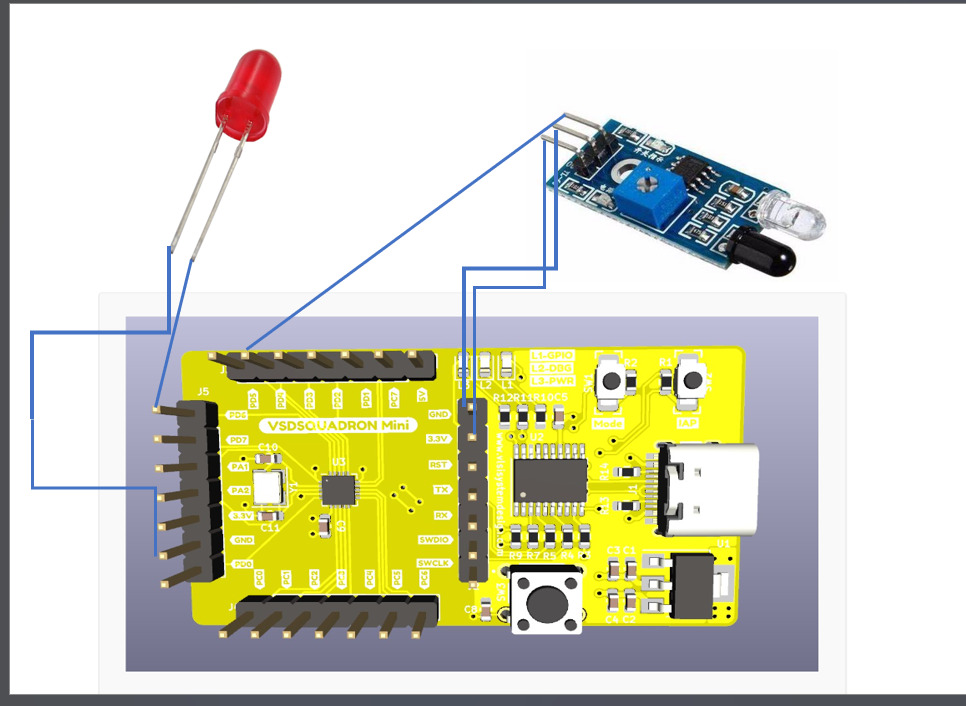
An automatic light system is a setup designed to automatically control the lighting based on the presence or absence of individuals within its detection range. This system will also give the indication of motion detected by blinking the led 3 times.
Components Required
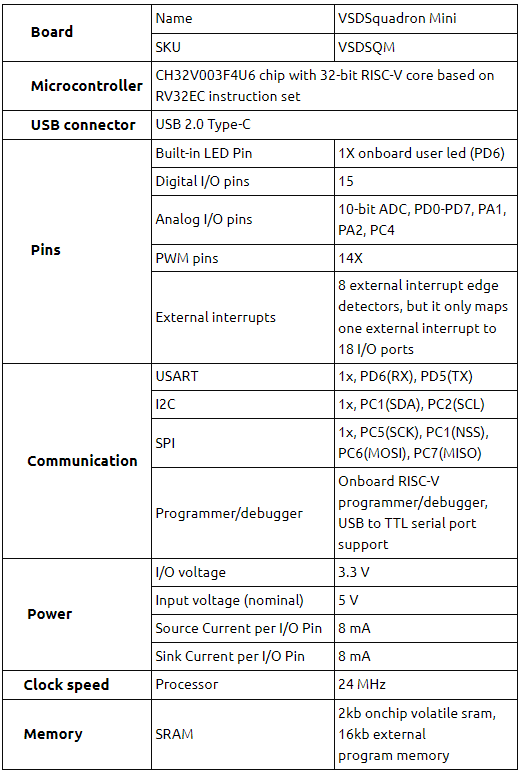
- VSDSquadron Mini Board
- IR Sensor
- LEDs
- Bread Board
- USB Cable
- Jumper Wires
Pin Diagram
| IR SENSOR, LED | VSD SQUADRON BOARD |
|---|---|
| VCC OF IR | 3.2V |
| GND OF IR | GND |
| OUT OF IR | PIN 4 |
| LED | PIN 6 |
Working
- The IR sensor is strategically placed in a location where it can detect the movement of individuals within its sensing range.
- The IR sensor continuously monitors its surroundings for any changes in infrared radiation caused by the movement of individuals.
- When someone enters the detection range of the IR sensor, it detects the change in radiation and triggers an output signal.
- When the IR sensor detects motion, it sends a signal to the microcontroller which then activates the LED lighting system. The LED lights up, providing illumination and the led will blink 3 times in the area where motion is detected which gives indication of motion detected.
C CODE
//These include the necessary header files (ch32v00x.h and debug.h) for the CH32V microcontroller and debugging purposes.
#include <ch32v00x.h>
#include <debug.h>
//pin configuration
void GPIO_Config(void)
{
GPIO_InitTypeDef GPIO_InitStructure = {0}; //structure variable GPIO_InitStructure of type GPIO_InitTypeDef which is used for GPIO configuration.

RCC_APB2PeriphClockCmd(RCC_APB2Periph_GPIOD, ENABLE); // to Enable the clock for Port D
//pin 4 OUT PIN FOR IR SENSOR
GPIO_InitStructure.GPIO_Pin = GPIO_Pin_4 ; // Defines which Pin to configure
GPIO_InitStructure.GPIO_Mode = GPIO_Mode_IPU; // Defines Output Type
GPIO_Init(GPIOD, &GPIO_InitStructure);
//pin 6 IS LED PIN
GPIO_InitStructure.GPIO_Pin = GPIO_Pin_6 ; //
GPIO_InitStructure.GPIO_Mode = GPIO_Mode_Out_PP; // Defines Output Type
GPIO_InitStructure.GPIO_Speed = GPIO_Speed_50MHz; // Defines speed

GPIO_Init(GPIOD, &GPIO_InitStructure);

}
//main function

int main(void)
{
uint8_t IR = 0;
uint8_t set=1;
uint8_t reset=0;
uint8_t a=0;
NVIC_PriorityGroupConfig(NVIC_PriorityGroup_2);// Configuring NVIC priority group
SystemCoreClockUpdate();// Update System Core Clock
Delay_Init();//Initialize Delay
GPIO_Config();//Call GPIO configuration function

while(1)
{
IR = GPIO_ReadInputDataBit(GPIOD, GPIO_Pin_4);
if (IR==1)//Read state of Pin 4 (IR sensor)
{ // for blinking of led three times upon motion detection
	for(a=0;a<3;a++){
GPIO_WriteBit(GPIOD, GPIO_Pin_6, set);
Delay_Ms(200);
GPIO_WriteBit(GPIOD, GPIO_Pin_6,reset);
Delay_Ms(100);}

}

}
}
Applications
- Security Lighting : These systems can be used for security lighting in outdoor spaces, such as gardens, driveways, and pathways, to deter intruders and provide visibility at night.
- Home Automation : Automatic light systems can be installed in homes, particularly in areas such as hallways, staircases, and bathrooms, where lights need to be turned on/off based on occupancy.
- Energy Efficiency : Automatic light systems contribute to energy conservation by ensuring that lights are not left on unnecessarily when the area is unoccupied.
- Accessibility : These systems can improve accessibility for individuals with disabilities by providing automatic illumination in response to their movement.
Conclusion
During the VSD Squadron mini Internship, I embarked on a journey exploring various aspects of VLSI system design on the RISC-V architecture, alongside open-source EDA tools.
Installation and Setup : I began by setting up the development environment, including installing VirtualBox for running Ubuntu and configuring the RISC-V toolchain, Yosys, Icarus Verilog, and GTKWave.
Understanding RISC-V Architecture : I delved into the fundamentals of the RISC-V architecture, learning about its open, versatile instruction set, instruction formats, operand types, and various instruction types and their opcodes.
Lab-Based Tasks : Engaging in lab-based tasks, I wrote and compiled C programs, simulated them using RISC-V GCC compiler and Spike, and analyzed the assembly code. You also performed functional simulation experiments using Verilog netlists and testbenches, utilizing Icarus Verilog and GTKWave.
Spike and Proxy Kernel : I explored the Spike simulator and Proxy Kernel, understanding their roles in simulating RISC-V programs and debugging them effectively.
Mini Project : Automatic Light System: As part of my project work, I implemented an automatic light system using the VSD Squadron mini board,
IR sensor, and LEDs, wrote C code to control the system, detecting motion with the IR sensor and indicating it through LED illumination.
Related Posts:
- NoRisk - Bluetooth automated smart access
- t1tan-strik3rs
- Shape Tomorrow’s Technology Today: ELCIA Hackathon…
- Advanced Easy to use Burgler Alarm
- Secure Saiyan
- Verifying The Functionality of VSD Mini Squadron…
- Implementation of 2-bit Comparator using VSDSquadron…
- LiFi Lock - An authentication system using LiFi…
- Home safety system
- PARKinSENSE


